
This isn’t necessarily a bad thing. But for developers, that often means ballooning applications stuffed with dozens of modules, pages, and functionalities. And sometimes, it can get tricky.
For example, two teams are working on the same dashboard page. One is building the analytics widget, while the other handles live notifications. Every time one team pushes an update, it risks tweaking the codebase in a way that disturbs the progress of the other team. Over time, coordinating all these moving parts becomes less than productive.
That’s where Angular micro frontends come in.
Instead of forcing everyone into one tightly coupled codebase, this architecture lets us break an app into independently developed and deployed ‘mini-apps’ where each team owns their part and works independently (and stress-free) on it.
What are Angular Micro Frontends?
You might already be familiar with microservices approach, where instead of having a large monolithic application serving all the requests, it’s divided into different services. This lets each service be developed, tested and delivered individually.
Angular micro frontends are the same thing but, as its name implies, it’s applied to front-end applications. So each team works on specific, feature-based apps which can then be merged into a single Angular app later on.
And for testing purposes, these mini-apps can coexist and be stitched together seamlessly within a shell app. If you’re familiar with Angular project structure best practices, you’ll see that micro frontends cater to all these, especially when comparing different Angular frameworks that can support micro frontends.
So from the user’s point of view, they will be using one app. While from the development side of things, it depends on how you want to serve the apps. They can be served individually, or you can package them all as a single app using advanced techniques like module federation.
What is Module Federation?
This is where the real magic happens. Module Federation is one of the most popular ways to handle micro frontend architecture for a reason.
Introduced in Webpack 5, Module Federation lets developers combine separate apps into one Angular application, where each separate app is loaded through lazy loading. The JavaScript applications share code at runtime, improving development productivity and also boosting the overall performance of the app. That means no more massive bundles, faster initial load times, and teams can deploy independently.
In the context of micro frontend Angular, it enables your mini-apps to dynamically import and execute code from other apps, without having to bundle everything upfront.
And if you were wondering if Angular supports Module Federation then the answer is that these technologies aren’t currently supported by the Angular CLI. But thanks to plugins like @Angular-architects/module-federation, making setup and configuration straightforward.
What are Angular Micro Frontends used for?
When you hire dedicated Angular developers, it’s good to know what to expect when using micro frontend Angular for your app development.
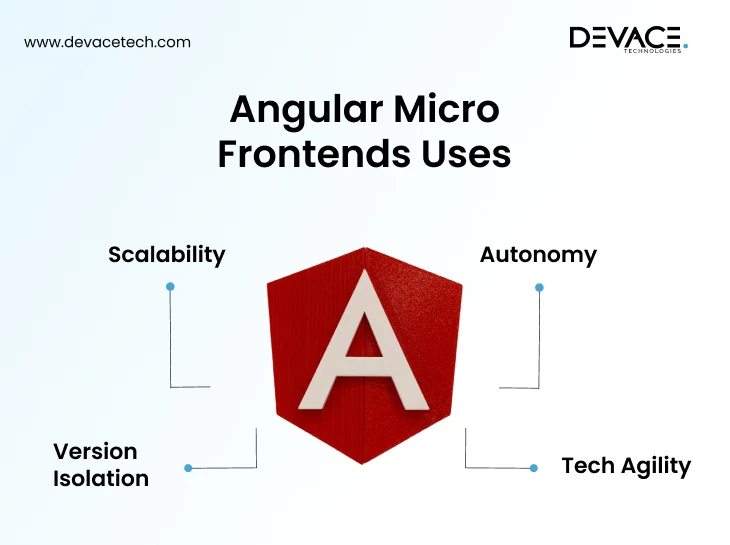
Based on their features, you’ll find that micro frontends Angular shines in large-scale enterprise applications, multi-team environments, or situations where you’re juggling multiple Angular versions. Here’s where they’re especially useful:
-
Scalability
For when you need to break teams up by features, not layers. Instead of organizing teams around technical layers (like frontend vs. backend), Angular micro frontends let you divide the work by feature. So one team can handle the user dashboard, another manages analytics, and each one ships their part independently.
-
Autonomy
Your teams can work without the coordination overhead. There are fewer meetings, and much less waiting. Each team works on their micro frontend without having to sync up constantly with the rest of the development team. This reduces bottlenecks and lets the teams move at their own pace.
-
Tech Agility
You might want to upgrade one part of your app to the latest Angular version while leaving the rest untouched or even experiment with Vue or React for a new module. With micro frontend Angular, now you can.
-
Version Isolation
With careful implementation, you can run the legacy AngularJS vs Angular versions side by side (with caution, of course). This gives you enough breathing room during the migrations instead of forcing risky, all-in-one rewrites.
The Challenges of Angular Micro Frontends
Before we go into the details of how to use Angular micro frontend module federation, let’s be real: this Angular micro frontend architecture isn’t all sunshine and scalability. There are a few trade-offs that you’ll have to navigate around.
-
Complexity
It becomes increasingly difficult to manage multiple repositories and coordinate the deployments. Managing the many codebases, pipelines, and build configurations for each micro frontend can lead to operational overhead in the long run. Your teams will need to carefully manage CI/CD pipelines and automate processes wherever possible to avoid bottlenecks.
-
Performance
Independent bundles can add some overhead if they’re not optimized.
Because each micro frontend is bundled separately, there’s a risk of an increased load time, especially if multiple apps are loaded simultaneously or if common libraries are duplicated.
To deal with this, remember to use lazy loading, shared dependencies, and efficient bundling strategies like using tree shaking, code splitting, and caching strategies to avoid the redundant payloads and make sure each micro frontend is delivering only what’s necessary.
-
Shared State
Managing state across independently deployed micro frontends can sometimes get messy, especially since real-world use cases often demand shared data like user sessions, themes, or preferences.
The best way forward lies in syncing this data without tightly coupling the apps.
You can easily avoid shared state disasters by implementing global state solutions like RxJS Subjects, NgRx, or Akita, or use custom events to broadcast state changes.
Another approach to this is to build a shared state service that’s exposed through module federation and consumed by all micro frontends. Just keep in mind that too much shared state can defeat the purpose of micro frontends, so only share what’s absolutely necessary.
-
Consistency
When using a multi-team micro frontend setup, keeping the user experience consistent across the board is something very commonly overlooked.
Each micro frontend is built and deployed by different teams, often working in isolation. Now, without any shared design principles, this always leads to mismatched UI elements, differing UX patterns, and an overall fragmented product feel which then takes up time and effort to fix.
This can easily be avoided by establishing a centralized design system beforehand. It should include a shared component library, UI styles, and brand guidelines to make things easier for the teams to build their UI components from this common set.
Also, you can set up design reviews and regular cross-team sync-ups to ensure there’s alignment on the layout, responsiveness, accessibility, and interactivity that will effortlessly come together once the micro frontends Angular are all pieced together into one app.
How to Implement Micro Frontends using Module Federation in Angular?
Now that you know Micro frontends Angular is your ticket to scaling with almost zero headaches, how do you actually pull off an Angular micro frontend module federation setup without getting lost in the configurations and routing chaos?
Step 1: Create a Shell App
Create a new Angular project using Angular CLI. This project will contain the global layout (header, footer, navigation) and will manage the routing to the micro frontends.
ng new shell --routing --style=scss
cd shell
ng add @angular-architects/module-federation --project shell --type host
This is your root container that hosts your micro apps. It follows the Angular micro frontend architecture, acting as the entry point for the users and coordinating the loading of different micro frontends for your separate developer teams.
The shell app’s role is to manage the routing, layout, and the seamless integration of all the micro frontends.
Step 2: Create Remote Apps (Micro Frontends)
Create separate Angular projects for each feature or functionality that will be part of your micro frontend architecture. These could be individual widgets, features, or sections of your main app (e.g., an analytics dashboard, a payment system, etc.).
Each micro frontend is a separate Angular project.
ng new mfe-analytics --routing --style=scss
cd mfe-analytics
ng add @angular-architects/module-federation --project mfe-analytics --type remote --host shell
The idea is to break down the main app into smaller units, which are then developed and deployed separately from the shell app, easily aligning with Angular micro frontend architecture.
You’ll then be prompted to expose a module. For example, expose the Analytics module like this:
? Which module would you like to expose? src/app/analytics/analytics.module.ts
? What should be the exposed file name? ./AnalyticsModule
This updates your webpack.config.js (handled behind the scenes by the plugin) and sets up ModuleFederationPlugin.
Step 3: Configure Module Federation Plugin
Next, install the @Angular-architects/module-federation plugin and set it up in the shell and remote apps. In the shell app, configure it to load the remote modules; in the remote app, you’ll expose the necessary modules.
For the shell app, add the ModuleFederationPlugin configuration to webpack.config.js and specify which remote modules should be dynamically loaded. Here’s a quick glance at what that should look like:
// shell/webpack.config.js
const { withModuleFederationPlugin } = require('@angular-architects/module-federation/webpack');

module.exports = withModuleFederationPlugin({
  remotes: {
    // Remote app name and URL to its remoteEntry.js
    dashboard: 'dashboard@http://localhost:4201/remoteEntry.js',
    analytics: 'analytics@http://localhost:4202/remoteEntry.js'
  },
  shared: {
    // Share Angular libraries to avoid duplication
    "@angular/core": { singleton: true, strictVersion: true },
    "@angular/common": { singleton: true, strictVersion: true },
    "@angular/router": { singleton: true, strictVersion: true }
  }
});
And for the remote apps, expose specific modules via the ModuleFederationPlugin. Then, configure which parts of your application should be made available to other apps. You can do this by following this code:
// dashboard/webpack.config.js
const { withModuleFederationPlugin } = require('@angular-architects/module-federation/webpack');

module.exports = withModuleFederationPlugin({
  name: 'dashboard',
  exposes: {
    // Expose your Angular module or component
    './DashboardModule': './src/app/dashboard/dashboard.module.ts',
  },
  shared: {
    "@angular/core": { singleton: true, strictVersion: true },
    "@angular/common": { singleton: true, strictVersion: true },
    "@angular/router": { singleton: true, strictVersion: true }
  }
});
The ModuleFederationPlugin allows the shell app to dynamically load modules from remote apps at runtime, without bundling everything upfront. You’ll use this plugin to share code and make each micro frontend accessible from the shell app.
Step 4: Routing & Lazy Loading
Use Angular’s lazy loading and routing mechanisms to load these micro apps dynamically.
Here’s how to do it: In the shell app, set up routing to load the micro frontends lazily. You’ll configure routes that load remote components on demand using Angular’s lazy loading mechanism combined with Module Federation. Here’s how:
import { NgModule } from '@angular/core';
import { RouterModule, Routes } from '@angular/router';
const routes: Routes = [
  // Define a route for the remote micro frontend
  {
    path: 'remote',
    loadChildren: () =>
      import('remoteApp/RemoteModule').then((m) => m.RemoteModule), // Lazy load the remote module
  },
  { path: '', redirectTo: '/home', pathMatch: 'full' }, // Default route for the shell app
];
  @NgModule({
  imports: [RouterModule.forRoot(routes)],
  exports: [RouterModule],
})
export class AppRoutingModule {}
Routing and lazy loading are both key to efficiently managing micro frontends. So, instead of loading all micro frontends upfront, this step lets the shell app only load the necessary micro frontends when the user navigates to a specific route. This minimizes the initial load time and keeps the user experience smooth.
Step 5: Shared Libraries
Next comes a few configurations. Configure Module Federation to share common dependencies like @Angular/core, @Angular/common, etc., between the shell and remote apps. Ensure that the same version of Angular is used across all apps to avoid conflicts and duplication.
Here’s how you can configure the shell app to share Angular libraries:
const ModuleFederationPlugin = require('webpack/lib/container/ModuleFederationPlugin');
const packageJson = require('./package.json');

module.exports = {
  // Other Webpack configurations...
  plugins: [
    new ModuleFederationPlugin({
      name: 'shellApp',
      remotes: {
        // Define the remote app(s) and their corresponding exposed modules
        remoteApp: 'remoteApp@http://localhost:4201/remoteEntry.js', // URL of the remote app
      },
      shared: {
        // Share Angular core and common dependencies
        '@angular/core': { singleton: true, eager: true },
        '@angular/common': { singleton: true, eager: true },
        '@angular/router': { singleton: true, eager: true },
        rxjs: { singleton: true, eager: true }, // Share rxjs to avoid duplication
        // You can add other shared libraries if needed
      },
    }),
  ],
};
Next, configure the remote app to share the same dependencies:
const ModuleFederationPlugin = require('webpack/lib/container/ModuleFederationPlugin');
const packageJson = require('./package.json');
module.exports = {

  // Other Webpack configurations...
  plugins: [
    new ModuleFederationPlugin({
      name: 'remoteApp',
        filename: 'remoteEntry.js', // This file will be consumed by the shell app
        exposes: {
          './RemoteModule': './src/app/remote/remote.module.ts', // Expose the module for the shell app
      },
      shared: {
        '@angular/core': { singleton: true, eager: true },
        '@angular/common': { singleton: true, eager: true },
        '@angular/router': { singleton: true, eager: true },
        rxjs: { singleton: true, eager: true },
        // Other shared libraries can be added here
      },
    }),
  ],
};
This helps reduce the bundle size and ensures that all apps use compatible versions of shared libraries to avoid redundant downloads and version mismatches. Configuring your apps to share the same libraries means they won’t have to take up time with duplicate loading.
Step 6: Independent Deployment
The last step would be to deploy each micro frontend to its own host.
When a micro frontend is updated, only the corresponding app needs to be redeployed, without touching the shell app or any of the other micro frontends.
In short, a micro frontend is expected to be independent even in its deployment. App A is deployed on host A, app B is deployed on host B. However, app B can also be called and integrated into app A through module federation, including sharing state. The big advantage is that changes and deployments of app B are made without changing anything or deploying in app A.
This step is made up of three parts:
- Remote App Configuration (webpack.config.js): This step allows you to expose the micro frontend module (the remote app) using the ModuleFederationPlugin so it can be independently deployed. Here’s how:
new ModuleFederationPlugin({
  name: 'remoteApp',
  filename: 'remoteEntry.js',
  exposes: {
    './RemoteModule': './src/app/remote/remote.module.ts',
  },
  shared: ['@angular/core', '@angular/common'],
}),
- Shell App Configuration (webpack.config.js): This configuration is for the shell app to specify the remote module it will dynamically load from the deployed remote app. Like this:
new ModuleFederationPlugin({
  name: 'shellApp',
  remotes: {
    remoteApp: 'remoteApp@https://your-remote-app-url/remoteEntry.js',
  },
  shared: ['@angular/core', '@angular/common'],
}),
- Lazy Loading in Shell App (routing): This sets up lazy loading in the shell app so that when the user navigates to the route, the shell app loads the remote module dynamically without bundling everything upfront. Here’s the code for it:
const routes: Routes = [
  {
    path: 'remote',
    loadChildren: () => import('remoteApp/RemoteModule').then(m => m.RemoteModule),
  },
];
Conclusion
Angular micro frontends are not just a trend—they’re a natural evolution of modern front-end architecture. By combining Micro Frontend architecture Angular with Module Federation, you unlock a powerful way to build scalable, maintainable, and future-ready apps.
Whether you’re modernizing legacy apps or building something new with a large team, this approach can seriously transform how you ship frontend code.
If you’re looking to scale your Angular development efforts, consider partnering with experts who understand the nuances. You can hire dedicated Angular developers to help implement micro frontend architectures the right way.
Hire Angular Developers with Devace Technologies
Are you looking to implement Angular micro frontends seamlessly? We provide robust Angular developers with the right skills and mindset that make it all easier for you. You can select from our three different engagement models that suit your project best and get started within 48 hours.
Book a meeting with us today!
Frequently Asked Questions
How do Angular Micro Frontends communicate with each other?
It depends on your specific needs and architecture. You can create shared services that manage communication between micro frontends by using Angular dependency injection system. Or you can use event-based communications like RxJS Subjects or Event Emitters or even a global state management library like NgRx or Akita.
The key is to keep communication minimal and intentional.
Using shared services or state management tools tends to keep things more organized, but event-based communication offers more flexibility in certain situations. It all depends on your app’s needs.
How do Angular Micro Frontends differ from Microservices?
Microservices manage the back-end logic and data, while micro frontends manage UI and front-end logic. Both aim for independent deployment, flexibility and scaling, but operate on different layers.
Micro frontends focus on breaking up the user interface into smaller, manageable pieces while microservices focus on dividing the back-end logic into smaller, autonomous services. So, authentication, payment processing, and order management are examples of services that would be handled by microservices as they relate to one specific business domain or process.
While dashboards, user profiles, and product pages are examples of micro frontends that are developed and deployed independently. They all contribute to the same user-facing application.
What are some common challenges of Angular Micro Frontend?
Angular micro frontends come with several challenges, like managing shared dependencies, deployment complexity, and routing conflicts. Performance can be impacted by the independent loading of multiple micro frontends, while state management across them can be tricky.
However, with effective strategies, having a centralized design system and using tools like Webpack Module Federation, these challenges can be easily managed.
Can Micro Frontends be used with other front-end frameworks?
Yes, one of the core advantages of the micro frontend architecture is its framework flexibility. You can build one micro app in Angular, another in React, and yet another in Vue, as long as you set up the integration properly and coordinate routing and state sharing carefully.